Tuesday, February 22, 2011

Old-Fashioned Meat Loaf

I kept debating whether or not to even post this recipe. It's not that it's not absolutely delicious. It's just that it's so basic. But like I've said before, this blog isn't about elaborate, crazy, how-the-heck-did-she-do-that type food. It's about passing along recipes that I've tested and really liked. Stuff that (for the most part) is super easy to make and is a crowd pleaser.
Meat loaf is kind of one of those ho-hum, Monday night type dishes. But honestly, this was one of the first dinners I made where my husband said, "This is the best meat loaf I've ever tasted". Talk about a confidence booster! It really is so basic and simple to throw together (might I add, cheap?), but is so full of flavor.

Old-Fashioned Meat Loaf
(Original recipe by Paula Deen)

Ingredients

  • 1 pound ground beef (for a more healthy dish, use ground turkey instead. For fancier, try adding equal parts veal and pork to the ground beef.)
  • 1 1/4 teaspoons salt
  • 1/4 teaspoon ground black pepper
  • 1/2 cup chopped onion
  • 1/2 cup chopped bell pepper
  • 1 egg, lightly beaten
  • 8 ounces canned diced tomatoes with juice (I can't seem to find an 8 oz can, so I just use a measuring cup... just try to keep the tomato/juice proportion about equal... nobody likes a runny loaf. hehe).
  • 1/2 cup quick-cooking oats

Topping:

  • 1/3 cup ketchup
  • 2 tablespoons brown sugar
  • 1 tablespoon prepared mustard

Directions

Preheat oven to 375 degrees F.
Mix all meatloaf ingredients well and place in a baking dish. Shape into a loaf (or like me, just use a loaf pan... for the life of me, my "loaf" never looked quite right when shaped it myself. The whole point of not using a loaf pan, though, was so that the topping would cover the sides as well. Try it though. Maybe you'll be more successfull at it than me).

Topping:

Mix ingredients for topping and spread on loaf. Bake for 1 hour.

It says it yields about 4 servings, but if so, those are some pretty hefty servings. I'd say more like 5 or 6, especially if you're having mashed potatoes with it.

Also, try making the leftovers into a sandwich. Yum.

Tuesday, February 15, 2011

Guacamole

Finally, a recipe I've made on my own.
It was bound to happen eventually, right? I'm a strict recipe follower.
My husband? He's a total recipe maker. He's made so many incredible dishes for me, but he never writes them down. I'm determined to stand next to him one of these days and take notes. That way I can actually share original recipes instead of stuff I like recipes.

I know guacamole isn't all that hard to make.
That's probably why I love it so much. It's full of flavor, but superduper easy.
There are a million different ways to make it too.
This is my version...

Guacamole

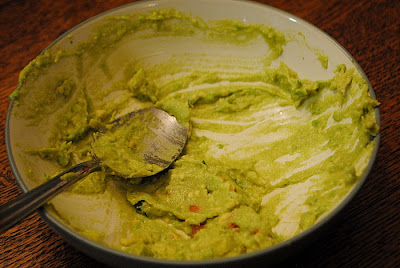
True story: Made this dip and meant to take a picture before serving. Got to tasting it, and before I knew it, my hubby and I had eaten most of it before I remembered to snap a picture. Oops!

Ingredients
  • 2 large Haas avocados
  • 1 medium tomato, diced
  • 1 Tbsp finely diced onion (red is best, but others will be fine)
  • 1 clove garlic, minced
  • 1 Tbsp fresh cilantro (said it before, fresh makes a major difference)
  • Juice of 1 lime (or lemon)
  • 2-3 drops of hot sauce (we use Texas Pete)
  • Dash of Kosher salt, to taste
  • *Optional* jalapeno, chopped
Directions
In a large bowl, mash avocados with a fork. Add tomato. Add onion, garlic, cilantro, lime juice, and hot sauce. Get out your bag of chips and start testing. Adjust recipe according to what you like in order to get a perfect balance.
If you're really daring and like some extra spice, add some chopped jalapenos.
Serve with your favorite tortilla chips.

Feeds about 2-3 hungry snackers.

Tuesday, February 8, 2011

Molten Lava Cakes

Ok, so I have a small confession to make about today's recipe... I've never actually made it. BUT. But, I really want to try it for Valentine's Day. I just couldn't wait until then to share it with you, in case you happen to be looking for an easy, romantic dessert. See? I had a good reason.
(And even if you're not so keen on the big ol' VDay, who doesn't love chocolate??? Make it for you and some friends... or just you. Nobody said you had to share.)
I actually saw this recipe about a year ago on TV and immediately saved it in my "to try later" pile. I included the video in case yall needed to see the pro in action. The recipe gets five star reviews, so it's worth a shot, right??
Tips: Try mixing up the chocolate. Use milk instead of semi-sweet. If you're not crazy about orange liqueur, try using a teaspoon of some sort of extract like mint. Also, watch the cakes. Some reviewers said the cooking time was a tad shorter than the recommended 14 minutes. But have fun with it! Don't stress about getting it perfect. The only way you learn (and get better) is through practice.

Molten Lava Cakes
(Original recipe by Paula Deen)


(Photo and video courtesy of Food Network)

Ingredients

  • 6 (1-ounce) squares bittersweet chocolate
  • 2 (1-ounce) squares semisweet chocolate
  • 10 tablespoons (1 1/4 stick) butter
  • 1/2 cup all-purpose flour
  • 1 1/2 cups confectioners' sugar
  • 3 large eggs
  • 3 egg yolks
  • 1 teaspoon vanilla extract
  • 2 tablespoons orange liqueur

Directions

Preheat oven to 425 degrees F.
Grease 6 (6-ounce) custard cups. Melt the chocolates and butter in the microwave, or in a double boiler. Add the flour and sugar to chocolate mixture. Stir in the eggs and yolks until smooth. Stir in the vanilla and orange liqueur. Divide the batter evenly among the custard cups. Place in the oven and bake for 14 minutes. The edges should be firm but the center will be runny. Run a knife around the edges to loosen and invert onto dessert plates.
Yields 6 servings.
(fyi, stick the other 4 in the fridge for later. Apparently, it makes the chocolate get all creamy. If you want it warm again, throw it in the microwave a few seconds.)

Thursday, February 3, 2011

Spicy Tortilla Soup

This recipe comes from Southern Living Ultimate Quick & Easy Recipes Cookbook.
I actually kinda stole this book from my mom (shh!!). Seriously, the woman has like 54583045 cookbooks and still makes the same old stuff found in my grandma's recipe box. Trust me, she's not missing this one. I actually told her a few times I had it, and she's yet to ask for it back.
Anyways...
I made this once for my hubby* when we were first married. He'd gotten a cold, and since he loved spicy stuff (and I was trying to show him I could be a good little housewife and make him soup). Unfortunately, I didn't think about the fact that he couldn't really taste anything. So what should've been a big hit? Um... yeah, I felt like a big, fat failure. I was mad at the recipe. It let me down.
Fast forward a couple of years...
I decided to give it another go, while he was perfectly healthy.
This time? He really enjoyed it.

*I know I refer to my husband all the time when I cook, but honestly, he's really my only taste tester most of the time. My biggest critic? The toddler. If he likes it, then you know it's worth trying. hehe.
Fyi, those peanut butter chunk cookies? I've had to make 3 more batches since I posted that recipe a couple weeks ago. If you haven't tried them yet, you should. :)

Spicy Tortilla Soup


Ingredients
  • 1/2 cup chopped onion
  • 1 garlic clove, minced
  • 1 Tbsp vegetable oil (I used EVOO instead)
  • 3 medium zucchini, sliced
  • 4 cups chicken broth
  • 1 (16 oz) can stewed tomatoes, undrained
  • 1 (15 ounce) can tomato sauce
  • 1 (11 ounce) can sweet whole kernel corn, undrained
  • 1 tsp ground cumin
  • 1/2 tsp pepper
  • Tortilla chips
  • 1/2 cup (2 oz) shredded Monterey Jack or Cheddar cheese
Directions
Saute onion and garlic in hot oil in a Dutch oven over medium heat until onion is tender. Add zucchini and next 6 ingredients; bring to a boil. Cover, reduce heat, and simmer 15 minutes.
Spoon soup into individual bowls. Top with tortilla chips and shredded cheese (don't let those chips sit too long or they'll get soggy).
Yield: 2 1/4 quarts.

Wednesday, February 2, 2011

Sloppy Joes

Growing up, we didn't eat Sloppy Joes all that often. I'm not sure why? I guess because it meant more mess for my mom to clean up. :) But my husband loves them. Once I made this dish, he was a total fan.
Sure, it's easy to pick up a canned mix, but I like the idea of using fresh ingredients. It makes it much healthier for you, plus this recipe really isn't all that hard.
Just toss it all together, cook, and serve!
The best part is that it calls for items I typically already have in my pantry/fridge.
It's a great go-to dinner when you're just not in the mood for anything complicated, but you don't want to sacrifice taste and quality.

Sloppy Joes
(Original recipe by the Neelys)

(Photo courtesy of Food Network)

Ingredients

  • 1 tablespoon vegetable oil
  • 1 green bell pepper, chopped
  • 1 red bell pepper, chopped
  • 2 garlic cloves, chopped
  • Salt and freshly ground black pepper
  • 2 pounds lean ground beef
  • 1 (8-ounce) can tomato sauce
  • 3 tablespoons tomato paste
  • 1 cup barbecue sauce
  • 1 tablespoon Worcestershire sauce
  • 1 teaspoon hot sauce (recommended: Tabasco)
  • 4 hamburger buns, split
  • Barbecue sauce, for topping

Directions

Heat oil in a large skillet with straight sides. Add the bell peppers and garlic. Saute until tender, about 3 minutes. Season with salt and pepper.

Add the ground beef to the vegetables. Stir and cook about 8 minutes, until the meat is no longer pink and fully cooked.

Add tomato sauce, tomato paste, barbecue sauce, Worcestershire, and hot sauce into the skillet. Stir. Simmer until thickened, about 10 minutes. Serve on hamburger bun with extra sauce.
Serves 4.

Tuesday, January 25, 2011

Roast Chicken and Vegetables for Two

One of my favorite wedding gifts we received happened to be the Bride & Groom First and Forever Cookbook by Mary Corpening Barber and Sara Corpening Whiteford. I have to admit, at first some of the recipes seemed pretty intimidating. I'm not sure why? But for the first time in a long time, I sat down and actually read through it. And while a lot of the dishes seem fancy, the directions seem, for the most part, fairly uncomplicated. I knew I needed to start tackling some of the recipes, so I decided to start with an easy one. And oh.my.goodness.
This dish is so delicious.
Have you ever tried to roast a chicken, only for it to turn out dry and disappointing?... No? Just me? Ok, well, even so, this chicken really has no choice but to stay moist with all the juices involved. And the veggies that go with it?? YUM.

Mary and Sara recommend spicing things up a bit if you end up using this recipe a lot, by using a rub or a glaze. Their suggestions: "experiment by rubbing the bird with jerk or Cajun seasoning, a cumin and coriander spice mixture, or coarse lavender salt (there are so many great spice rubs out in the marketplace to try). Brushing with a mixture of warm honey, rosemary, and cayenne is over the top (I tried this one, but definitely keep a close eye on it, because the glaze will burn), and basting with bacon grease and maple syrup is sweet home Carolina (tent with foil midway through roasting if using sweet glazes, to avoid burning)."

Roast Chicken and Vegetables for Two
(Original recipe by Mary Corpening Barber and Sara Corpening Whiteford)


Ingredients
  • 3 carrots, cut into thirds
  • 6 small red mew potatoes, quartered if large
  • 1 medium yellow onion, cut into 6 wedges
  • 3 tablespoons unsalted butter, melted, or olive oil
  • Kosher salt and freshly ground pepper
  • 1 chicken (3 to 4 pounds)
  • 1 lemon, quartered
  • 2 fresh rosemary sprigs
  • 4 cloves garlic, peeled and smashed
Directions

Preheat the oven to 425 degrees F.
Put the carrots, potatoes, and onion in a 9-by-13-inch glass baking dish. Toss the vegetables with 1 tablespoon of butter. Season with kosher salt and pepper to taste.  Spread the vegetables to the edges of the baking dish, making room for the chicken.
Remove the neck and giblets from the cavity of the chicken and discard. Rinse the bird under cold running water and pat dry. Put the chicken, breast-side up, in the center of the baking dish. Brush the chicken with the remaining 2 tablespoons butter. Season the cavity and skin generously with kosher salt and pepper to taste. Put the lemon quarters and rosemary sprigs inside the cavity. Put the garlic cloves under the chicken to prevent them from burning.
Roast for 45 minutes.  Remove the dish from the oven.  Using tongs, tilt the chicken, pouring the juices from the cavity onto the vegetables, and shake to coat.  Baste the chicken with the pan juices.  If the bird is browning too quickly, cover with aluminum foil.  Continue roasting until the chicken is a deep golden brown and the juices run clear when the tip of a knife is inserted into the thigh joint, or until an instant-read thermometer inserted into the thigh, away from the bone, registers 170 to 175 degrees F, 25 to 30 minutes more.
Transfer the chicken to a platter, cover loosely with aluminum foil, and let stand for 10 to 15 minutes before carving. Using the back or a spoon, mash the garlic and squeeze some lemon into the pan juices. Toss the juices with the vegetables. Carve the chicken* and serve the vegetables alongside. Drizzle any remaining juices over the chicken.

Note: Our favorite way to serve roasted chicken to our families is to carve all the meat from the bones after the meat has rested and chop it into bite-sized pieces. We then return the meat to the garlicky, lemony pan juices, re-season it with more salt and pepper, and toss with the vegetables. This way, every last bit of chicken is well seasoned and moist throughout (breasts included).


*Carving a Chicken or Turkey
  1. Anchor the breast of the bird with a carving fork and, using a boning or carving knife, cut through the skin between the thigh and the breast. Pull the leg and second joint outward. This exposes the joint at the bottom of the thigh, which is easily cut through.
  2. Detach the leg and cut the thigh away from the drumstick. Turn the bird around and repeat with the other leg.
  3. If serving the wings separately, pull the wing out from the breast and cut through the joint that connects with wing to the breast.  Repeat with the other wing.
  4. For chicken, you may opt to serve the breasts whole. To do this, cut between the meat and the bone, angling the knife toward the bone. Otherwise, cut thin slices of the breast meat on a diagonal to the breastbone, including a little skin with each slice.

Saturday, January 22, 2011

Peanut Butter Cookies with Chocolate Chunks

I know there are a lot of learning tools out there for kids, and the majority of them are fabulous.
But one in particular that I'm a BIG believer in is baking.
Getting in the kitchen with your kid is so good for them. While cooking is good, baking is usually my go-to activity with my toddler. Cooking tends to involve raw meat, hot skillets, and knives. Yeah, not quite there yet. :) But baking? Definitely an appropriate learning tool.
Sure it's a little messy. But that's ok. Spilled sugar can always be cleaned up.
I love that my little guy gets to feel different textures, try different tastes (flour = blech, sugar = yum), develop fine motor skills by helping me pour ingredients in, see what happens when you blend these things together, and eventually learn about measurements.
But best of all?
It's full-on mommy/baby time.
And when they're grown? It'll help boost confidence.
Not only do they get to see and taste the results of their work, but they feel validated when mom (and dad too) praises them for helping and doing such a great job.

(Don't worry, I don't serve our baby-handled goodies to other people! They're just for us! lol)

Alrighty, so now that I've thoroughly bored you with my opinions on child-rearing, how about we move on to today's recipe??

Anyone else out there watch The Biggest Loser? (fyi, that new trainer they have this season? Brett? All I have to say is, "Nice job, NBC". Sorry, hun... still think you're super hot... ). Well if you've seen even one season, then you're probably familiar with one of their guest chefs they have on there quite often. Curtis Stone is pretty darn talented, however until today, I'd never tried any of his recipes. I'm not sure why?? Well, I am officially a big fan now.
One of my goals for this year is to try and keep freshly baked something in our kitchen. It makes it feel more home-y, whether it be cookies or bread or whatever. But that can lead to some added poundage, and that conflicts with my other goal for this year. So my mission was to find a tasty cookie recipe that didn't use shortening + butter + eggs + oil that equaled to oh.my.gosh.I'm.gaining.weight.looking.at.them!

Enter Curtis Stone.

I looove that he used unbleached flour. That's all I use, mainly because the idea of eating bleach just grosses me out. And it works just the same. He used honey instead of oil, only 1/2 cup of butter (unlike my dear Paula who uses way too much), one egg, natural peanut butter, and only a cup of sugar all together.
My thighs are thanking him.
(But don't blame me that they're so good you eat them all in a day. You've been warned).

Peanut Butter Cookies with

Chocolate Chunks

(Original recipe by Curtis Stone)

(Photo courtesy of Curtis Stone)

Ingredients

1 cup unbleached all-purpose flour
1/2 teaspoon baking soda
1/2 teaspoon salt
1 cup natural chunky peanut butter (about 9 ounces) (We use JIF all-natural, because you don't have to refrigerate it. If you like nuts, go chunky. If not, go creamy. We used creamy, and it was ah-maz-ing.)
1/2 cup (packed) light brown sugar
1/2 cup granulated sugar
1/2 cup (1 stick) unsalted butter, at room temperature
1 ½ tablespoons honey
1 large egg
1 teaspoon vanilla extract
5 ounces semisweet chocolate, coarsely chopped (I used Nestle's semisweet chunks. Saves time)

Directions

  1. Preheat the oven to 350°F.
  2. Line 3 heavy large baking sheets with parchment paper. (I was out, so I skipped this. It didn't make a difference)
  3. Mix the flour, baking soda, and salt in a medium bowl.
  4. Using an electric mixer, beat the peanut butter, brown sugar, granulated sugar, butter, honey, egg, and vanilla in a large bowl until well blended.
  5. Stir the dry ingredients into the peanut butter mixture in 2 additions.
  6. Stir in the chopped chocolate.
  7. Scoop about 3 tablespoonfuls of dough for each cookie onto the prepared baking sheets, spacing them 2 1/2 inches apart. (It's going to seem like a lot of cookie when you're forming them. Trust the recipe. You won't be disappointed.)
  8. Bake for about 12 minutes, or until the cookies puff and begin to brown on top but are still very soft to the touch. (Very important! Don't overbake!)
  9. Cool the cookies on the baking sheets for 5 minutes.
  10. Using a metal spatula, transfer the cookies to a rack and eat warm or cool completely.
Makes about 20 cookies.