Tuesday, January 25, 2011

Roast Chicken and Vegetables for Two

One of my favorite wedding gifts we received happened to be the Bride & Groom First and Forever Cookbook by Mary Corpening Barber and Sara Corpening Whiteford. I have to admit, at first some of the recipes seemed pretty intimidating. I'm not sure why? But for the first time in a long time, I sat down and actually read through it. And while a lot of the dishes seem fancy, the directions seem, for the most part, fairly uncomplicated. I knew I needed to start tackling some of the recipes, so I decided to start with an easy one. And oh.my.goodness.
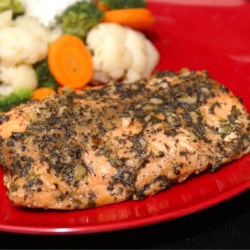
This dish is so delicious.
Have you ever tried to roast a chicken, only for it to turn out dry and disappointing?... No? Just me? Ok, well, even so, this chicken really has no choice but to stay moist with all the juices involved. And the veggies that go with it?? YUM.

Mary and Sara recommend spicing things up a bit if you end up using this recipe a lot, by using a rub or a glaze. Their suggestions: "experiment by rubbing the bird with jerk or Cajun seasoning, a cumin and coriander spice mixture, or coarse lavender salt (there are so many great spice rubs out in the marketplace to try). Brushing with a mixture of warm honey, rosemary, and cayenne is over the top (I tried this one, but definitely keep a close eye on it, because the glaze will burn), and basting with bacon grease and maple syrup is sweet home Carolina (tent with foil midway through roasting if using sweet glazes, to avoid burning)."

Roast Chicken and Vegetables for Two
(Original recipe by Mary Corpening Barber and Sara Corpening Whiteford)


Ingredients
  • 3 carrots, cut into thirds
  • 6 small red mew potatoes, quartered if large
  • 1 medium yellow onion, cut into 6 wedges
  • 3 tablespoons unsalted butter, melted, or olive oil
  • Kosher salt and freshly ground pepper
  • 1 chicken (3 to 4 pounds)
  • 1 lemon, quartered
  • 2 fresh rosemary sprigs
  • 4 cloves garlic, peeled and smashed
Directions

Preheat the oven to 425 degrees F.
Put the carrots, potatoes, and onion in a 9-by-13-inch glass baking dish. Toss the vegetables with 1 tablespoon of butter. Season with kosher salt and pepper to taste.  Spread the vegetables to the edges of the baking dish, making room for the chicken.
Remove the neck and giblets from the cavity of the chicken and discard. Rinse the bird under cold running water and pat dry. Put the chicken, breast-side up, in the center of the baking dish. Brush the chicken with the remaining 2 tablespoons butter. Season the cavity and skin generously with kosher salt and pepper to taste. Put the lemon quarters and rosemary sprigs inside the cavity. Put the garlic cloves under the chicken to prevent them from burning.
Roast for 45 minutes.  Remove the dish from the oven.  Using tongs, tilt the chicken, pouring the juices from the cavity onto the vegetables, and shake to coat.  Baste the chicken with the pan juices.  If the bird is browning too quickly, cover with aluminum foil.  Continue roasting until the chicken is a deep golden brown and the juices run clear when the tip of a knife is inserted into the thigh joint, or until an instant-read thermometer inserted into the thigh, away from the bone, registers 170 to 175 degrees F, 25 to 30 minutes more.
Transfer the chicken to a platter, cover loosely with aluminum foil, and let stand for 10 to 15 minutes before carving. Using the back or a spoon, mash the garlic and squeeze some lemon into the pan juices. Toss the juices with the vegetables. Carve the chicken* and serve the vegetables alongside. Drizzle any remaining juices over the chicken.

Note: Our favorite way to serve roasted chicken to our families is to carve all the meat from the bones after the meat has rested and chop it into bite-sized pieces. We then return the meat to the garlicky, lemony pan juices, re-season it with more salt and pepper, and toss with the vegetables. This way, every last bit of chicken is well seasoned and moist throughout (breasts included).


*Carving a Chicken or Turkey
  1. Anchor the breast of the bird with a carving fork and, using a boning or carving knife, cut through the skin between the thigh and the breast. Pull the leg and second joint outward. This exposes the joint at the bottom of the thigh, which is easily cut through.
  2. Detach the leg and cut the thigh away from the drumstick. Turn the bird around and repeat with the other leg.
  3. If serving the wings separately, pull the wing out from the breast and cut through the joint that connects with wing to the breast.  Repeat with the other wing.
  4. For chicken, you may opt to serve the breasts whole. To do this, cut between the meat and the bone, angling the knife toward the bone. Otherwise, cut thin slices of the breast meat on a diagonal to the breastbone, including a little skin with each slice.

Saturday, January 22, 2011

Peanut Butter Cookies with Chocolate Chunks

I know there are a lot of learning tools out there for kids, and the majority of them are fabulous.
But one in particular that I'm a BIG believer in is baking.
Getting in the kitchen with your kid is so good for them. While cooking is good, baking is usually my go-to activity with my toddler. Cooking tends to involve raw meat, hot skillets, and knives. Yeah, not quite there yet. :) But baking? Definitely an appropriate learning tool.
Sure it's a little messy. But that's ok. Spilled sugar can always be cleaned up.
I love that my little guy gets to feel different textures, try different tastes (flour = blech, sugar = yum), develop fine motor skills by helping me pour ingredients in, see what happens when you blend these things together, and eventually learn about measurements.
But best of all?
It's full-on mommy/baby time.
And when they're grown? It'll help boost confidence.
Not only do they get to see and taste the results of their work, but they feel validated when mom (and dad too) praises them for helping and doing such a great job.

(Don't worry, I don't serve our baby-handled goodies to other people! They're just for us! lol)

Alrighty, so now that I've thoroughly bored you with my opinions on child-rearing, how about we move on to today's recipe??

Anyone else out there watch The Biggest Loser? (fyi, that new trainer they have this season? Brett? All I have to say is, "Nice job, NBC". Sorry, hun... still think you're super hot... ). Well if you've seen even one season, then you're probably familiar with one of their guest chefs they have on there quite often. Curtis Stone is pretty darn talented, however until today, I'd never tried any of his recipes. I'm not sure why?? Well, I am officially a big fan now.
One of my goals for this year is to try and keep freshly baked something in our kitchen. It makes it feel more home-y, whether it be cookies or bread or whatever. But that can lead to some added poundage, and that conflicts with my other goal for this year. So my mission was to find a tasty cookie recipe that didn't use shortening + butter + eggs + oil that equaled to oh.my.gosh.I'm.gaining.weight.looking.at.them!

Enter Curtis Stone.

I looove that he used unbleached flour. That's all I use, mainly because the idea of eating bleach just grosses me out. And it works just the same. He used honey instead of oil, only 1/2 cup of butter (unlike my dear Paula who uses way too much), one egg, natural peanut butter, and only a cup of sugar all together.
My thighs are thanking him.
(But don't blame me that they're so good you eat them all in a day. You've been warned).

Peanut Butter Cookies with

Chocolate Chunks

(Original recipe by Curtis Stone)

(Photo courtesy of Curtis Stone)

Ingredients

1 cup unbleached all-purpose flour
1/2 teaspoon baking soda
1/2 teaspoon salt
1 cup natural chunky peanut butter (about 9 ounces) (We use JIF all-natural, because you don't have to refrigerate it. If you like nuts, go chunky. If not, go creamy. We used creamy, and it was ah-maz-ing.)
1/2 cup (packed) light brown sugar
1/2 cup granulated sugar
1/2 cup (1 stick) unsalted butter, at room temperature
1 ½ tablespoons honey
1 large egg
1 teaspoon vanilla extract
5 ounces semisweet chocolate, coarsely chopped (I used Nestle's semisweet chunks. Saves time)

Directions

  1. Preheat the oven to 350°F.
  2. Line 3 heavy large baking sheets with parchment paper. (I was out, so I skipped this. It didn't make a difference)
  3. Mix the flour, baking soda, and salt in a medium bowl.
  4. Using an electric mixer, beat the peanut butter, brown sugar, granulated sugar, butter, honey, egg, and vanilla in a large bowl until well blended.
  5. Stir the dry ingredients into the peanut butter mixture in 2 additions.
  6. Stir in the chopped chocolate.
  7. Scoop about 3 tablespoonfuls of dough for each cookie onto the prepared baking sheets, spacing them 2 1/2 inches apart. (It's going to seem like a lot of cookie when you're forming them. Trust the recipe. You won't be disappointed.)
  8. Bake for about 12 minutes, or until the cookies puff and begin to brown on top but are still very soft to the touch. (Very important! Don't overbake!)
  9. Cool the cookies on the baking sheets for 5 minutes.
  10. Using a metal spatula, transfer the cookies to a rack and eat warm or cool completely.
Makes about 20 cookies.

Wednesday, January 19, 2011

Lemon Blossoms

Guess who's birthday it is! Just one of my most favorite people ever...

You can read a very quick summary of her rags-to-riches (and why I love this woman so much) right here.

To celebrate, I figured I would feature the very first recipe I ever made of Paula's.
We had gone down to Myrtle Beach with my family, not long after we'd gotten married. A couple of my great aunts live there, and we like to visit with them whenever we're there.
Anyway, my Aunt Louise had made a batch of these delicious Lemon Blossoms. I'd seen Paula Deen make them on tv before, but I'd never tried them. My husband isn't much of a sweet eater, so I figured it'd be a waste to bother. However, one bite of these, and my husband just couldn't stop raving about them.

After that trip, I decided to give them a try.
I'm SO glad I did.
The recipe makes so many of them, I took them into work to share with the ladies I worked with. Let me tell you, you would've thought I'd brought in a box full of Krispy Kreme doughnuts.
They actually taste a little like a doughnut with the sweet glaze.
And besides their fabulous taste, they're cheap.
The whole recipe consists of nine ingredients, the majority being items you typically keep in your pantry on a regular basis. The stuff you'd have to buy? All super inexpensive.

Anyway, they've been a staple in my recipe collection ever since.
They're a little time consuming (especially the first time around when you're testing them out), so plan to make these when you're in the mood to bake and don't have anywhere to be for awhile.
It's totally worth it, I promise!

Lemon Blossoms
(Original recipe by Paula Deen)


(Photo courtesy of Food Network)

Ingredients

  • 18 1/2-ounce package yellow cake mix (I'm partial to Duncan Hines. Out of all the box mixes, they seem to have the best taste and consistency. I get rave reviews when I use them, every.single.time.)
  • 3 1/2-ounce package instant lemon pudding mix
  • 4 large eggs
  • 3/4 cup vegetable oil

Glaze:

  • 4 cups confectioners' sugar
  • 1/3 cup fresh lemon juice
  • 1 lemon, zested
  • 3 tablespoons vegetable oil
  • 3 tablespoons water

Directions

Preheat the oven to 350 degrees F.

Spray miniature muffin tins with vegetable oil cooking spray. Combine the cake mix, pudding mix, eggs and oil and blend well with an electric mixer until smooth, about 2 minutes. Pour a small amount of batter, filling each muffin tin half way. Bake for 12 minutes. Turn out onto a tea towel
To make the glaze, sift the sugar into a mixing bowl. Add the lemon juice, zest, oil, and 3 tablespoons water. Mix with a spoon until smooth.

With fingers, dip the cupcakes into the glaze while they're still warm, covering as much of the cake as possible, or spoon the glaze over the warm cupcakes, turning them to completely coat. Place on wire racks with waxed paper underneath to catch any drips. Let the glaze set thoroughly, about 1 hour, before storing in containers with tight-fitting lids.

Yields 5 dozen! Get ready to share! :)

Monday, January 17, 2011

Chocolate Crepes

Growing up, my brother and I had French Au Pairs (I know, it sounds snooty, but I promise, I'm not a spoiled brat. lol). My mom really wanted us to learn French at a young age. I actually did learn a lot, but without speaking it constantly, I lost most of it.

Anyway, what I do remember is the FOOD.
Freshly baked bread daily (no kidding. our house constantly smelled like a bakery). Fluffy chocolate mousse. And one of my favorites... crepes.

They were filled with everything imaginable. Chicken, eggs, fruits... the possibilities were endless.

So needless to say, when I saw this recipe on tv, I knew I had to try it.

Chocolate Crepes
(Original recipe by Paula Deen)

(photo courtesy of Food Network)

Ingredients

  • 3 eggs, large
  • 1 1/3 cups milk
  • 3/4 cup all-purpose flour
  • 6 tablespoons butter, melted, plus more for pan (Note: This is WAY too much butter. It'll make it too greasy. I would cut it to two or three. Just play with it and see what you like.)
  • 2 tablespoons cocoa powder
  • Pinch salt
(Suggestion: add a little bit of vanilla, sugar, and cinnamon to the batter for a sweeter variation.)

Directions

In a medium mixing bowl, whisk the eggs. Add remaining ingredients and whisk vigorously until combined, small lumps are ok. Set batter aside to rest for 20 minutes.
Heat an 8-inch nonstick saute pan over medium heat. Lightly brush the pan with melted butter. Pour 1/4 cup batter into the hot pan, twirling the pan so the batter spreads out evenly into a very thin layer. Cook about 30 seconds until the crepe comes away from the sides of the pan. Gently flip the crepe over with your fingers or the help of a rubber spatula and continue cooking another few seconds. Transfer to a plate and repeat cooking crepes until all the batter is used.

Now the crepes can be filled and topped to your liking. Try whipped cream, chocolate sauce, hazelnut spread, butter, jam, caramel sauce, powdered sugar, peanut butter, fresh fruit etc.

Just fyi, the actual crepe isn't very sweet, so if that's what you're looking for, I would add sweet filling. When I made them, I spread the middle with Nutella then added sliced bananas and strawberries. I folded it, then added a little Cool Whip on top, then drizzled with chocolate syrup. SO good. :)

Friday, January 14, 2011

Y'all are going to have to excuse me for being so quiet lately. My other blog has been suffering from neglect as well. But I'm fixin' to remedy that right now. :)

Ever tried to make fried chicken at home, only to be disappointed that it just didn't turn out quite right? I'm a true Southern girl who loves her some fried chicken (in moderation, of course). And as much I like some KFC or Bojangles, I needed to be able to brag that I can cook some fried chicken. It's just one of those things I needed to do myself.
I tried so many different kinds of recipes over the years, but this one is the only one that really doesn't disappoint. The chicken stays juicy and the crust is crispy. Perfect combo. (I mean, really. Who wants a soggy chicken?)

Southern Fried Chicken
(original recipe by Paula Deen)

(photo source Food Network)

Ingredients

  • 3 eggs
  • 1/3 cup water
  • About 1 cup hot red pepper sauce (recommended: Texas Pete)
  • 2 cups self-rising flour
  • 1 teaspoon pepper
  • House seasoning, recipe follows
  • 1 (1 to 2 1/2-pound) chicken, cut into pieces
  • Oil, for frying, preferably peanut oil

Directions

In a medium size bowl, beat the eggs with the water. Add enough hot sauce so the egg mixture is bright orange. In another bowl, combine the flour and pepper. Season the chicken with the house seasoning. Dip the seasoned chicken in the egg, and then coat well in the flour mixture.
Heat the oil to 350 degrees F in a deep pot. Do not fill the pot more than 1/2 full with oil.
Fry the chicken in the oil until brown and crisp. Dark meat takes longer then white meat. It should take dark meat about 13 to 14 minutes, white meat around 8 to 10 minutes.

*Added by me: Try a true Southern method of draining the chicken and place it on a paper bag. It absorbs the grease and won't cost you in paper towels. :)

House Seasoning:

  • 1 cup salt
  • 1/4 cup black pepper
  • 1/4 cup garlic powder
Mix ingredients together and store in an airtight container for up to 6 months.

Tuesday, January 4, 2011

Banana Blueberry Pancakes

I just have to say, I'm so glad I started this foodie blog.
It's made me try recipes that've sat in my cookbooks, binders, and boxes for years. You know what I mean. You clip or save a recipe, assuming you'll eventually get around to trying it... but for some reason, you never do. Well, this is one of those recipes.
Christmas 2009, I went to stay with my mom for a few days with my 5 month old baby (my hubby was sick with the flu, so we hightailed it outa there!). While we were there, she happened to get a new cookbook in the mail. It was full of healthy, yummy options. And of course, since I'd just had a baby, I was desperate to lose the baby weight and still enjoy food at the same time.

Useless fact about me: I love breakfast food. Anytime of the day. My favorite dinner is breakfast. It's just fun and comforting and so good. These pancakes happened to be in that healthy cookbook, and I was so excited! Fyi, I don't remember which cookbook it was (possibly a Weight Watchers?) and neither does my mom... so I can't really give proper credit.

But then I never tried them... until tonight!
I don't know why I waited so long. They're waaaayyy better than a box mix any day. And much healthier for you! I already had all of the ingredients I needed, and I'm so glad I made them.
Definitely melt-in-your-mouth pancakes.

The only change I made was the milk. The original recipe calls for skim milk, but I used whole... mainly because I have a one-year-old and was planning on sharing (um... maybe not anymore) with him. I doubt there's much of a difference, however I do wonder if they ended up a tad richer because of the whole milk? Either way, I'm pretty sure they're delicious! Add a little powdered sugar, and you've got yourself a dessert!

(I put the nutrition info at the bottom, in case you're interested)

Banana Blueberry Pancakes


Ingredients
  • 1 cup whole wheat flour
  • 1/2 cup all purpose flour
  • 2 Tbsp sugar
  • 2 tsp baking powder
  • 1/2 tsp salt
  • 1 egg, lightly beaten
  • 1 1/4 fat free milk
  • 3 medium ripe bananas, mashed
  • 1 tsp vanilla extract
  • 1 1/2 fresh or frozen blueberries*
Directions
In a large bowl, combine flour, sugar, baking powder, and salt. Combine the egg, milk, bananas, and vanilla; stir into dry ingredients just until moistened. Pour batter by 1/4 cupfuls onto a hot griddle coated with cooking spray; sprinkle with blueberries. Turn when bubbles form on top; cook until second side is golden brown (be careful not to make your griddle too hot - you'll end up with burnt outside, doughy inside). Serve with syrup if desired.
Yields about 14 pancakes.

*Note: if using frozen blueberries, do not thaw.

2 pancakes = 195 calories, 2g fat, 4g fiber, 6g protein, 41g carbs


Monday, January 3, 2011

Baked Salmon

Happy New Year!
I hope everyone had a fabulous holiday! Did you eat your collards and black-eyed peas? ;)

I've been busy trying out new recipes to share with you! The first one is a good, cheapo meal (especially if the salmon is on sale, like ours was). It's not one of those overly rich type foods, but most everyone has these ingredients on hand (minus the fresh salmon).
I found it on the AllRecipes website when I was looking for a new salmon recipe. For the amount of effort put in, it turned out pretty good!

(ps. if you want to minimize the "fishiness" of it, peel off the skin before baking)

Baked Salmon


(photo from AllRecipes.com


Ingredients

  • 2 cloves garlic, minced
  • 6 tablespoons light olive oil
  • 1 teaspoon dried basil
  • 1 teaspoon salt
  • 1 teaspoon ground black pepper
  • 1 tablespoon lemon juice
  • 1 tablespoon fresh parsley, chopped
  • 2 (6 ounce) fillets salmon

Directions

  1. In a medium glass bowl, prepare marinade by mixing garlic, light olive oil, basil, salt, pepper, lemon juice and parsley. Place salmon fillets in a medium glass baking dish, and cover with the marinade. Marinate in the refrigerator about 1 hour, turning occasionally.
  2. Preheat oven to 375 degrees F (190 degrees C).
  3. Place fillets in aluminum foil, cover with marinade, and seal. Place sealed salmon in the glass dish, and bake 35 to 45 minutes, until easily flaked with a fork.
Yields: 2 servings